How to Make Any-night-of-the-week Noodle with Assorted Meat

How to Make Any-night-of-the-week Noodle with Assorted Meat

Noodle with Assorted Meat.

Noodle with Assorted Meat

Hello everybody, I hope you're having an amazing day today. Today, I will show you a way to prepare a special dish, noodle with assorted meat. It is one of my favorites food recipes. For mine, I will make it a little bit unique. This will be really delicious.

Noodle with Assorted Meat is one of the most popular of current trending foods in the world. It is simple, it is quick, it tastes delicious. It's appreciated by millions daily. Noodle with Assorted Meat is something which I have loved my whole life. They are fine and they look fantastic.

To begin with this recipe, we must first prepare a few ingredients. You can cook noodle with assorted meat using 13 ingredients and 2 steps. Here is how you cook that.

The ingredients needed to make Noodle with Assorted Meat:

  1. {Take 1 pack of noodle.
  2. {Get 1 of boiled egg.
  3. {Get 1 of boiled salted egg.
  4. {Take Half of piece of pig ear.
  5. {Prepare 1 piece of tofu.
  6. {Prepare 1 of small slice of Pork liver.
  7. {Prepare 2 tbsp of lightt soy sauce.
  8. {Prepare 1 tbsp of dark soy sauce.
  9. {Make ready 2 of star anise.
  10. {Get 2 tbsp of cooking wine.
  11. {Get 2 slices of ginger.
  12. {Make ready 3 pieces of rock sugar.
  13. {Take 2 glass of water.

Steps to make Noodle with Assorted Meat:

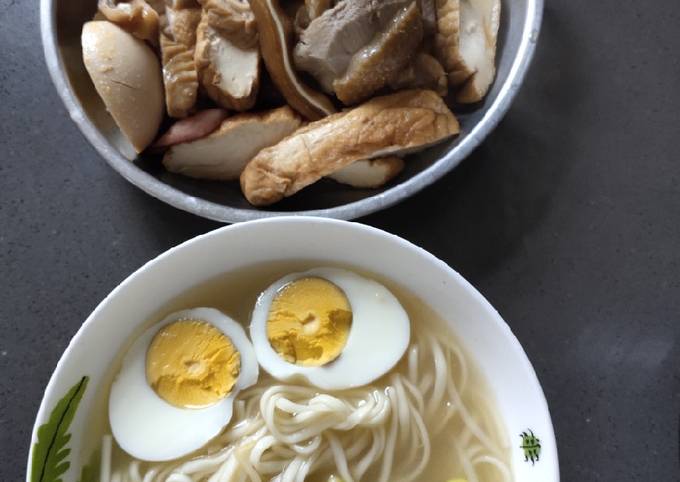
  1. Combine salted egg tofu pig ear pork liver.Star anise light soy sauce dark soy sauce rock sugar water cooking wine.Boil them all for an hour.After an.hour remibe and slice into pieces and place in a plate.Serve with.noodle..
  2. Boil.noodle and boil.egg then cut into halves.Place in a bowl together with noodle..

So that's going to wrap this up with this exceptional food noodle with assorted meat recipe. Thanks so much for your time. I'm confident that you will make this at home. There's gonna be interesting food at home recipes coming up. Remember to bookmark this page in your browser, and share it to your family, colleague and friends. Thanks again for reading. Go on get cooking!

How to Prepare Homemade Better Skin Power Smoothie Feat. Coconut,
Mango & Avocado!

How to Prepare Homemade Better Skin Power Smoothie Feat. Coconut, Mango & Avocado!

Better Skin Power Smoothie Feat. Coconut, Mango & Avocado!.

Better Skin Power Smoothie Feat. Coconut, Mango & Avocado!

Hey everyone, it's Drew, welcome to our recipe page. Today, we're going to prepare a special dish, better skin power smoothie feat. coconut, mango & avocado!. It is one of my favorites. This time, I will make it a bit unique. This will be really delicious.

Better Skin Power Smoothie Feat. Coconut, Mango & Avocado! is one of the most popular of current trending meals in the world. It's simple, it is fast, it tastes yummy. It's appreciated by millions daily. Better Skin Power Smoothie Feat. Coconut, Mango & Avocado! is something which I have loved my whole life. They're nice and they look fantastic.

To get started with this recipe, we must first prepare a few components. You can cook better skin power smoothie feat. coconut, mango & avocado! using 10 ingredients and 4 steps. Here is how you cook that.

The ingredients needed to make Better Skin Power Smoothie Feat. Coconut, Mango & Avocado!:

  1. {Take of Avocado, chopped.
  2. {Get of Organic Coconut Oil.
  3. {Take of Grapeseed Oil.
  4. {Take of Cinnamon.
  5. {Make ready of Honey.
  6. {Take of Mango, peeled and chopped.
  7. {Take of Carrot, chopped.
  8. {Make ready of Apple, chopped.
  9. {Prepare of Ice cubes.
  10. {Take of Vanilla Extract (Optional).

Steps to make Better Skin Power Smoothie Feat. Coconut, Mango & Avocado!:

  1. Rinse all fresh ingredients with cold water..
  2. Blend until smooth and desired consistency..
  3. Sprinkle extra dash of cinnamon on top if desired!.
  4. Enjoy!.

So that is going to wrap it up with this special food better skin power smoothie feat. coconut, mango & avocado! recipe. Thank you very much for your time. I'm confident that you can make this at home. There is gonna be interesting food at home recipes coming up. Don't forget to bookmark this page on your browser, and share it to your family, colleague and friends. Thanks again for reading. Go on get cooking!

Recipe of Speedy Dill Turkey Salad

Recipe of Speedy Dill Turkey Salad

Dill Turkey Salad. In medium bowl, combine turkey, tomato, cucumber and onion.. mustard, yogurt and dill weed until well coated. Turkey Dill Salad Diced Turkey Chopped onion Chopped celery Dill salt & pepper Mayo (we used reduced fat or fat free) Directions: Dice turkey, onions and celery and put in bowl. Add dill weed and mayo and stir to blend.

Dill Turkey Salad Stir in turkey and celery until well combined. Season with salt and pepper to taste. In a large bowl, thoroughly mix the eggs, turkey, pickles, prepared sandwich and salad sauce and mayonnaise.

Hey everyone, it is me, Dave, welcome to my recipe page. Today, I'm gonna show you how to make a special dish, dill turkey salad. One of my favorites. This time, I'm gonna make it a bit unique. This is gonna smell and look delicious.

In medium bowl, combine turkey, tomato, cucumber and onion.. mustard, yogurt and dill weed until well coated. Turkey Dill Salad Diced Turkey Chopped onion Chopped celery Dill salt & pepper Mayo (we used reduced fat or fat free) Directions: Dice turkey, onions and celery and put in bowl. Add dill weed and mayo and stir to blend.

Dill Turkey Salad is one of the most favored of current trending meals in the world. It is easy, it is quick, it tastes yummy. It is appreciated by millions every day. Dill Turkey Salad is something which I've loved my entire life. They are fine and they look wonderful.

To begin with this recipe, we have to prepare a few components. You can cook dill turkey salad using 7 ingredients and 3 steps. Here is how you can achieve it.

The ingredients needed to make Dill Turkey Salad:

  1. {Get 1 of Baked Turkey Roll or Left Over Turkey.
  2. {Make ready of Dill Relish.
  3. {Take of Mayo.
  4. {Make ready of Poultry Season.
  5. {Prepare of Tomatoes.
  6. {Make ready of Green onion.
  7. {Make ready of Bacon Bits.

This is no ordinary potato salad. This salad consists of potatoes, turkey hot dogs, pickles, scallions, hard-boiled eggs, and sweet peas. All of the ingredients are finely chopped and dressed with mayonnaise. This salad has been in my family for four generations.

Steps to make Dill Turkey Salad:

  1. Shred your Turkey to your desire. Add mayo, poultry season, dill relish and poultry season..
  2. Mix it all.
  3. Pan the Turkey mixture out in your dish of choice and sprinkle bacon bits and green onion evenly. And sprinkle cheddar cheese..

Instructions Add turkey into a large bowl along with celery, onion, cranberries, almonds, mayo, yogurt, lemon juice, mustard, pepper, salt and fresh dill. Add turkey, celery, onion and green pepper; toss to combine. Combine dressing mix, sour cream, Miracle Whip and garlic salt. Add to pasta mixture and mix well. How to make turkey salad from scratch In a large mixing bowl, add all turkey salad ingredients (the shredded/chopped turkey, celery, green onions, dried cranberries, pecans, mayonnaise, mustard, lemon juice, salt, pepper, and dill).

So that is going to wrap it up with this special food dill turkey salad recipe. Thank you very much for your time. I am sure that you will make this at home. There's gonna be interesting food in home recipes coming up. Remember to bookmark this page in your browser, and share it to your loved ones, friends and colleague. Thank you for reading. Go on get cooking!

Recipe of Award-winning Green Sour Cream Chicken Enchilada Layers

Recipe of Award-winning Green Sour Cream Chicken Enchilada Layers

Green Sour Cream Chicken Enchilada Layers.

Green Sour Cream Chicken Enchilada Layers

Hello everybody, it is Jim, welcome to my recipe page. Today, I'm gonna show you how to make a distinctive dish, green sour cream chicken enchilada layers. One of my favorites food recipes. For mine, I'm gonna make it a little bit unique. This will be really delicious.

Green Sour Cream Chicken Enchilada Layers is one of the most well liked of recent trending meals in the world. It's appreciated by millions every day. It is easy, it's fast, it tastes delicious. They are fine and they look fantastic. Green Sour Cream Chicken Enchilada Layers is something that I've loved my entire life.

To begin with this particular recipe, we have to prepare a few ingredients. You can have green sour cream chicken enchilada layers using 14 ingredients and 6 steps. Here is how you can achieve it.

The ingredients needed to make Green Sour Cream Chicken Enchilada Layers:

  1. {Take of boneless skinless chicken breast.
  2. {Prepare of chili powder.
  3. {Take of salt.
  4. {Make ready of garlic powder.
  5. {Take of ground cumin.
  6. {Prepare of cayenne.
  7. {Prepare of cilantro - tied with kitchen twine.
  8. {Get of Enough water to cover chicken in pot.
  9. {Prepare of cans green enchilada sauce.
  10. {Take of small soft white corn tortillas.
  11. {Get of shredded cheddar jack cheese.
  12. {Make ready of unsalted butter.
  13. {Get of flour.
  14. {Make ready of sour cream.

Instructions to make Green Sour Cream Chicken Enchilada Layers:

  1. Place chicken in a 2 quart sauce pan. Sprinkle with next 5 ingredients. Top with cilantro bundle. Add enough water to cover chicken by 1 inch. Cover. Bring to a boil over medium high heat. Reduce heat to medium low. Simmer 15-20 minutes..
  2. Drain chicken. Use 2 forks to carefully shred. Place shredded chicken in a bowl. Pour 3/4 of the first can of sauce over chicken. Stir to combine. Pour remaining 1/4 can of sauce in bottom of a 6x8 casserole (usually a 2 quart). Swirl to coat. Set both aside..
  3. Rinse sauce pan used to cook chicken. Place on stove over medium heat. Add butter. When melted wisk in flour for 1 minute. Wisk in second can of sauce until thickened..
  4. When sauce has thickened remove from heat. Let sit off heat for about 2 minutes to cool slightly. Wisk in sour cream..
  5. Assemble: arrange 4 tortillas on top of sauce in dish (they will be overlapping), arrange half the chicken evenly over tortillas, sprinkle 1/2 cup cheese over chicken, drizzle 1/3 of the sour cream sauce over cheese. Top with four more tortillas, second half of chicken another 1/2 cup of cheese and another 1/3 of the sauce. Finish with last 4 tortillas, then remaining sauce. Finally sprinkle evenly with last cup of cheese..
  6. Bake in a preheated 400° oven for 20 minutes or until cheese is melted and golden. Let rest 5-10 minutes before serving. Cut into 6-8 pieces. Serve with Mexican inspired sides if desired. Enjoy!.

So that's going to wrap it up with this special food green sour cream chicken enchilada layers recipe. Thank you very much for reading. I am sure that you will make this at home. There is gonna be more interesting food at home recipes coming up. Don't forget to save this page in your browser, and share it to your family, friends and colleague. Thanks again for reading. Go on get cooking!

Recipe of Homemade Mayo and vegetable Sandwich

Recipe of Homemade Mayo and vegetable Sandwich

Mayo and vegetable Sandwich.

Mayo and vegetable Sandwich

Hey everyone, hope you are having an incredible day today. Today, I will show you a way to prepare a distinctive dish, mayo and vegetable sandwich. It is one of my favorites food recipes. For mine, I'm gonna make it a little bit tasty. This is gonna smell and look delicious.

Mayo and vegetable Sandwich is one of the most well liked of current trending foods in the world. It's enjoyed by millions every day. It's simple, it's fast, it tastes delicious. They're nice and they look fantastic. Mayo and vegetable Sandwich is something which I've loved my whole life.

To begin with this recipe, we must prepare a few components. You can cook mayo and vegetable sandwich using 7 ingredients and 7 steps. Here is how you cook that.

The ingredients needed to make Mayo and vegetable Sandwich:

  1. {Make ready of cabbage shredded.
  2. {Prepare of carrot grated.
  3. {Get of thinly cut slices of tomato.
  4. {Prepare of thinly cut slices avocado.
  5. {Prepare of Salt and Black pepper to taste.
  6. {Prepare of bread slices.
  7. {Make ready of mayonnaise.

Steps to make Mayo and vegetable Sandwich:

  1. Grate carrot and cabbage..
  2. Cut avocado and tomato in thin slices and sprinkle some salt and pepper over them..
  3. Toast two slices of bread on a pan or in a toaster..
  4. Take mayonnaise is a bowl and add grated vegetables. Sprinkle some salt and pepper and mix well..
  5. Now spread this mix on the toasted bread and place slices of tomato and avocado. Cover it with the other toast..
  6. Place the sandwich on the pan and warm it up. If you want apply some butter but I didn’t..
  7. Enjoy the mayonnaise sandwich with tea or coffee..

So that's going to wrap this up with this exceptional food mayo and vegetable sandwich recipe. Thank you very much for reading. I'm confident you can make this at home. There's gonna be more interesting food at home recipes coming up. Don't forget to save this page on your browser, and share it to your family, friends and colleague. Thank you for reading. Go on get cooking!

Easiest Way to Prepare Favorite halwa

Easiest Way to Prepare Favorite halwa

halwa. Halva (also halvah, halwa, and other spellings) refers to various local confection recipes in West Asia and its vicinity. The name is used for referring to a huge variety of confections. carrot halwa in telugu/Gajar Ka Halwa/carrot halwa recipe with milk/how to make carrot halwa recipe. Karachi Halwa (Winter Special) Famous Bombay Halwa.

halwa Halwa is a sweet dish most famous in all india in different forms. There are various names of Halwa with similar ingredients like HALWA, Seera, Lapsee, Kesari bhat, Lapata, Soozi Halwa. Halwa - A Delicious Mouthwatering Sweet Dessert.

Hello everybody, I hope you are having an amazing day today. Today, I will show you a way to make a special dish, halwa. One of my favorites. This time, I'm gonna make it a bit tasty. This is gonna smell and look delicious.

Halva (also halvah, halwa, and other spellings) refers to various local confection recipes in West Asia and its vicinity. The name is used for referring to a huge variety of confections. carrot halwa in telugu/Gajar Ka Halwa/carrot halwa recipe with milk/how to make carrot halwa recipe. Karachi Halwa (Winter Special) Famous Bombay Halwa.

halwa is one of the most well liked of recent trending meals on earth. It is appreciated by millions daily. It is easy, it is quick, it tastes yummy. halwa is something that I have loved my entire life. They're nice and they look wonderful.

To begin with this recipe, we have to first prepare a few ingredients. You can have halwa using 8 ingredients and 6 steps. Here is how you cook it.

The ingredients needed to make halwa:

  1. {Take 2 tbsp of butter.
  2. {Get 2 of cardamom.
  3. {Make ready 1 cup of semolina.
  4. {Prepare 2 cup of water.
  5. {Get 1 cup of sugar.
  6. {Get 1 tbsp of almonds.
  7. {Prepare 1 tbsp of coconut.
  8. {Make ready 1 tbsp of pistachio.

The word halwa is actually Arabic and it derived from the word 'hilwa which means 'sweet' and in Arabic, it is pronounced as 'hull waa' and is served. Halwa is not an everyday dessert in the way, say, a pint of ice cream is after a bad day, but it's not reserved solely for special occasions like an île flottante. Instead, it tends to live in the realm of small. Sooji Halwa is often made on festivals and to celebrate special occassions!

Instructions to make halwa:

  1. in a midium size pot heat clarified 2 tbsp butter and fry 2-3 cardamom for 2 minutes.
  2. add 1 and half cup semolina and stir fry constantly on low heat till its colour turn pale gold and becomes fragrent.
  3. add 1 cup water ,1 and half sugar ,pinch a saffron and continue stirring till sugar dissolves..
  4. whewm the mixture thickness pour in a flat bottomed dish.
  5. garnish 1 tbsp almonds, 1 tbsp coconut ,1 tbsp pistache and press gently in order to level it.
  6. cut into diamond shape and serve.

I remember eating bowls of sooji halwa during Navratri! Find delicious halwa recipe at KFoods.com. Halwa is the most sought after recipe during religious events and celebrations. Either it is an Islamic Shab e Bara'at or Diwali, halwa recipe is the. Multani Sohan Halwa Recipe - Multani Sohan Halwa is popular traditional dessert of Indo Pak subcontinent.

So that is going to wrap it up with this special food halwa recipe. Thank you very much for reading. I'm confident that you can make this at home. There's gonna be more interesting food at home recipes coming up. Remember to save this page on your browser, and share it to your loved ones, friends and colleague. Thanks again for reading. Go on get cooking!

Recipe of Award-winning Turkey Salad

Recipe of Award-winning Turkey Salad

Turkey Salad.

Turkey Salad

Hello everybody, it is Drew, welcome to our recipe page. Today, I'm gonna show you how to make a special dish, turkey salad. One of my favorites. This time, I am going to make it a little bit unique. This will be really delicious.

Turkey Salad is one of the most favored of current trending foods on earth. It's simple, it's fast, it tastes yummy. It's appreciated by millions every day. Turkey Salad is something which I have loved my entire life. They're nice and they look wonderful.

To get started with this particular recipe, we must prepare a few components. You can cook turkey salad using 9 ingredients and 1 steps. Here is how you cook it.

The ingredients needed to make Turkey Salad:

  1. {Make ready 4 oz of Turkey breast.
  2. {Get of English Cucumber.
  3. {Take of Cherry tomatoes.
  4. {Prepare of Mix lettuce.
  5. {Get of Bacon bits (real).
  6. {Get of Kosher salt.
  7. {Take of Course ground pepper.
  8. {Prepare of Shredded parmesan.
  9. {Get of Shredded chadder.

Steps to make Turkey Salad:

  1. Chop all your veggies add, lettuce, turkey, tomatoes,cucumber, bacon bits, shredded cheese and, your choice of salad dressing..

So that's going to wrap it up for this exceptional food turkey salad recipe. Thanks so much for reading. I am sure that you will make this at home. There's gonna be interesting food at home recipes coming up. Remember to bookmark this page on your browser, and share it to your family, colleague and friends. Thank you for reading. Go on get cooking!

Recipe of Speedy Mom's chicken salad

Recipe of Speedy Mom's chicken salad

Mom's chicken salad.

Mom's chicken salad

Hey everyone, it is Jim, welcome to our recipe site. Today, I will show you a way to make a special dish, mom's chicken salad. One of my favorites. For mine, I am going to make it a little bit unique. This is gonna smell and look delicious.

Mom's chicken salad is one of the most favored of recent trending foods on earth. It is easy, it is fast, it tastes yummy. It's enjoyed by millions every day. Mom's chicken salad is something that I have loved my entire life. They're fine and they look fantastic.

To get started with this particular recipe, we have to first prepare a few ingredients. You can have mom's chicken salad using 7 ingredients and 9 steps. Here is how you can achieve it.

The ingredients needed to make Mom's chicken salad:

  1. {Make ready of boneless skinless chicken breasts.
  2. {Prepare of chopped bread and butter pickles.
  3. {Make ready of chopped small onion.
  4. {Get of chopped celery ribs.
  5. {Take of kraft mayo.
  6. {Take of miracle whip.
  7. {Make ready of salt and pepper.

Instructions to make Mom's chicken salad:

  1. Boil the chicken until done.. cool completely and clean all fat etc off.. chop and shred.
  2. Mix all ingredients together and chill..
  3. If it soaks up the mayo alot.. which breasts tend to do. Add more mayo and miracle whip.. I like mine a bit dry...
  4. This recipe makes a good bit.. great for celebrations and parties...
  5. I serve with fresh crusty rolls or bread. it is also great with a variety of crackers..
  6. Enjoy..
  7. Side note.. if the breasts are small use 8 instead of 6.. fyi. I used 8 and an entire jar of mayo and 2 cups of miracle whip...
  8. .
  9. .

So that is going to wrap it up with this exceptional food mom's chicken salad recipe. Thanks so much for reading. I'm confident that you can make this at home. There's gonna be more interesting food at home recipes coming up. Remember to save this page in your browser, and share it to your loved ones, friends and colleague. Thank you for reading. Go on get cooking!

Recipe of Perfect Oreo Nutella Cheesecake

Recipe of Perfect Oreo Nutella Cheesecake

Oreo Nutella Cheesecake.

Oreo Nutella Cheesecake

Hello everybody, I hope you are having an amazing day today. Today, I'm gonna show you how to prepare a distinctive dish, oreo nutella cheesecake. One of my favorites. For mine, I'm gonna make it a little bit tasty. This is gonna smell and look delicious.

Oreo Nutella Cheesecake is one of the most well liked of recent trending meals in the world. It is enjoyed by millions daily. It is simple, it is fast, it tastes delicious. They're fine and they look fantastic. Oreo Nutella Cheesecake is something which I've loved my whole life.

To begin with this recipe, we must prepare a few components. You can have oreo nutella cheesecake using 6 ingredients and 5 steps. Here is how you can achieve it.

The ingredients needed to make Oreo Nutella Cheesecake:

  1. {Take of Oreo biscuits (crushed).
  2. {Prepare of Philadelphia cream cheese.
  3. {Prepare of Nutella.
  4. {Get of Butter (melted).
  5. {Take of Heavy cream (optional).
  6. {Get of Cadbury chocolate.

Instructions to make Oreo Nutella Cheesecake:

  1. In a bowl, mix oreo crumbs and melted butter and press it into a cake pan.
  2. In a large bowl, beat the cream cheese and Nutella until smooth..
  3. Pour it into the cake pan on top of the biscuit base.
  4. Refrigerate for an hour or two.
  5. Add heavy cream and Cadbury chocolate shaving if desired.

So that is going to wrap this up with this exceptional food oreo nutella cheesecake recipe. Thanks so much for your time. I'm sure you can make this at home. There is gonna be more interesting food in home recipes coming up. Remember to save this page on your browser, and share it to your family, colleague and friends. Thanks again for reading. Go on get cooking!

Steps to Prepare Award-winning Crock Pot BBQ Pulled Pork Sandwiches

Steps to Prepare Award-winning Crock Pot BBQ Pulled Pork Sandwiches

Crock Pot BBQ Pulled Pork Sandwiches.

Crock Pot BBQ Pulled Pork Sandwiches

Hello everybody, hope you're having an amazing day today. Today, I'm gonna show you how to make a distinctive dish, crock pot bbq pulled pork sandwiches. It is one of my favorites. For mine, I am going to make it a bit tasty. This is gonna smell and look delicious.

Crock Pot BBQ Pulled Pork Sandwiches is one of the most popular of current trending foods in the world. It's simple, it is fast, it tastes delicious. It is appreciated by millions daily. They're fine and they look wonderful. Crock Pot BBQ Pulled Pork Sandwiches is something which I've loved my whole life.

To get started with this particular recipe, we have to prepare a few ingredients. You can cook crock pot bbq pulled pork sandwiches using 7 ingredients and 3 steps. Here is how you cook that.

The ingredients needed to make Crock Pot BBQ Pulled Pork Sandwiches:

  1. {Take 5 lbs of Pork Shoulder.
  2. {Take 40 oz of bottle favorite barbecue sauce.
  3. {Make ready of Juice from 2 lemons.
  4. {Take 1/2-3/4 cup of Brown sugar - to taste.
  5. {Make ready of Chopped Onion - Optional.
  6. {Prepare of Buns of choice.
  7. {Make ready of Halve the ingredients if you're making it for yourself or 2-3 people. This recipe is doubled for approximately 5-6 people.

Instructions to make Crock Pot BBQ Pulled Pork Sandwiches:

  1. Slice Pork into quarters, place into crock pot & cook low 10-12 hours or on High 6-7 hours. You do not need to add water. It will produce its own juices. Turn over every so often to avoid burning..
  2. Drain excess juice from crock & shred roast into fine pieces. Mix in the barbecue sauce of choice, juice from the lemons & about 1/2 - 3/4 cup of brown sugar. You can also add a some chopped onion if you'd like. Cook an additional 2 hours on low or 1 hour on high..
  3. Serve on buns of choice with pickles, baked beans, potato salad, chips or whatever your heart desires. Enjoy!.

So that is going to wrap it up with this exceptional food crock pot bbq pulled pork sandwiches recipe. Thank you very much for reading. I'm sure that you will make this at home. There is gonna be interesting food at home recipes coming up. Remember to bookmark this page in your browser, and share it to your loved ones, colleague and friends. Thanks again for reading. Go on get cooking!

Easiest Way to Make Perfect Firefly Squid and Nanohana Corzetti

Easiest Way to Make Perfect Firefly Squid and Nanohana Corzetti

Firefly Squid and Nanohana Corzetti.

Firefly Squid and Nanohana Corzetti

Hello everybody, I hope you are having an amazing day today. Today, I'm gonna show you how to make a distinctive dish, firefly squid and nanohana corzetti. It is one of my favorites food recipes. For mine, I'm gonna make it a little bit tasty. This is gonna smell and look delicious.

Firefly Squid and Nanohana Corzetti is one of the most favored of current trending foods on earth. It is appreciated by millions daily. It's easy, it's fast, it tastes delicious. Firefly Squid and Nanohana Corzetti is something that I have loved my entire life. They are fine and they look fantastic.

To get started with this particular recipe, we must first prepare a few components. You can have firefly squid and nanohana corzetti using 9 ingredients and 4 steps. Here is how you cook that.

The ingredients needed to make Firefly Squid and Nanohana Corzetti:

  1. {Make ready 12 of sheets Corzetti pasta.
  2. {Make ready 10 of Firefly squid.
  3. {Get 4 of Broccolini.
  4. {Make ready 4 grams of Garlic.
  5. {Get 3 grams of Anchovies.
  6. {Take 100 grams of Fresh tomatoes.
  7. {Take 30 grams of Tomato sauce.
  8. {Take 1 of Olive oil.
  9. {Prepare 1 of Salt.

Steps to make Firefly Squid and Nanohana Corzetti:

  1. Gently stir-fry the firefly squid, garlic, and olive oil in a frying pan..
  2. Add the anchovies and fresh tomatoes. Lightly simmer over low heat, then add the lightly boiled broccolini..
  3. Boil and fry the corzetti, then coat with the sauce in the frying pan..
  4. Emulsify with olive oil to finish..

So that's going to wrap this up with this special food firefly squid and nanohana corzetti recipe. Thank you very much for reading. I am sure you will make this at home. There is gonna be interesting food in home recipes coming up. Remember to bookmark this page in your browser, and share it to your family, colleague and friends. Thanks again for reading. Go on get cooking!

Easiest Way to Make Any-night-of-the-week Honey Brown Sugar Glazed
Carrots

Easiest Way to Make Any-night-of-the-week Honey Brown Sugar Glazed Carrots

Honey Brown Sugar Glazed Carrots.

Honey Brown Sugar Glazed Carrots

Hey everyone, it is John, welcome to my recipe site. Today, we're going to prepare a distinctive dish, honey brown sugar glazed carrots. One of my favorites. This time, I am going to make it a little bit unique. This is gonna smell and look delicious.

Honey Brown Sugar Glazed Carrots is one of the most well liked of current trending meals on earth. It's enjoyed by millions daily. It is easy, it is fast, it tastes delicious. They're nice and they look fantastic. Honey Brown Sugar Glazed Carrots is something which I've loved my entire life.

To get started with this recipe, we must prepare a few components. You can cook honey brown sugar glazed carrots using 5 ingredients and 2 steps. Here is how you can achieve it.

The ingredients needed to make Honey Brown Sugar Glazed Carrots:

  1. {Take of Baby carrots.
  2. {Prepare of butter.
  3. {Get of salt.
  4. {Prepare of brown sugar.
  5. {Take of honey.

Steps to make Honey Brown Sugar Glazed Carrots:

  1. Brown carrots with butter and salt on med-low heat for 5-8 minutes in a pan..
  2. Mix in honey and brown sugar and let bubble for 3-5 minutes until carrots are tender..

So that is going to wrap it up for this exceptional food honey brown sugar glazed carrots recipe. Thank you very much for reading. I'm sure you will make this at home. There is gonna be interesting food in home recipes coming up. Remember to save this page on your browser, and share it to your family, friends and colleague. Thanks again for reading. Go on get cooking!

Recipe of Ultimate Pan Seared Salmon with Avocado Tomato Cucumber Salad

Recipe of Ultimate Pan Seared Salmon with Avocado Tomato Cucumber Salad

Pan Seared Salmon with Avocado Tomato Cucumber Salad.

Pan Seared Salmon with Avocado Tomato Cucumber Salad

Hey everyone, I hope you're having an amazing day today. Today, we're going to prepare a special dish, pan seared salmon with avocado tomato cucumber salad. One of my favorites food recipes. For mine, I'm gonna make it a bit tasty. This will be really delicious.

Pan Seared Salmon with Avocado Tomato Cucumber Salad is one of the most well liked of current trending meals on earth. It is enjoyed by millions daily. It's easy, it is quick, it tastes delicious. They're nice and they look fantastic. Pan Seared Salmon with Avocado Tomato Cucumber Salad is something which I've loved my whole life.

To get started with this recipe, we must prepare a few components. You can have pan seared salmon with avocado tomato cucumber salad using 4 ingredients and 3 steps. Here is how you can achieve that.

The ingredients needed to make Pan Seared Salmon with Avocado Tomato Cucumber Salad:

  1. {Make ready 4 pcs of (@170 gr) salmon fillet, around 2 cm thick (with or without skin).
  2. {Get 1 Tbsp of olive oil.
  3. {Prepare 1/2 tsp of salt or to taste.
  4. {Make ready 1/4 tsp of ground black pepper or taste.

Instructions to make Pan Seared Salmon with Avocado Tomato Cucumber Salad:

  1. Season the salmon with salt and black pepper powder. Set aside..
  2. Heat olive oil in a skillet over medium high heat until shimmering. Place the salmon in the skillet, skin side up. Cook for 4 minutes until crisp..
  3. Carefully flip the salmon. Reduce the heat to medium. Cook for another 5-6 minutes. Remove from the heat. Serve the salmon with the avocado tomato cucumber salad. Yum! 😋.

So that's going to wrap it up for this special food pan seared salmon with avocado tomato cucumber salad recipe. Thanks so much for your time. I am confident you will make this at home. There's gonna be more interesting food at home recipes coming up. Remember to bookmark this page in your browser, and share it to your family, colleague and friends. Thank you for reading. Go on get cooking!

Step-by-Step Guide to Prepare Any-night-of-the-week Miso Glazed Pumpkin

Step-by-Step Guide to Prepare Any-night-of-the-week Miso Glazed Pumpkin

Miso Glazed Pumpkin.

Miso Glazed Pumpkin

Hello everybody, it is Drew, welcome to our recipe page. Today, we're going to make a special dish, miso glazed pumpkin. One of my favorites food recipes. For mine, I will make it a little bit unique. This will be really delicious.

Miso Glazed Pumpkin is one of the most favored of current trending meals in the world. It's enjoyed by millions daily. It's simple, it's quick, it tastes yummy. Miso Glazed Pumpkin is something that I have loved my whole life. They're nice and they look fantastic.

To begin with this recipe, we have to first prepare a few ingredients. You can cook miso glazed pumpkin using 5 ingredients and 3 steps. Here is how you can achieve it.

The ingredients needed to make Miso Glazed Pumpkin:

  1. {Get of tsp.miso.
  2. {Prepare of brown sugar.
  3. {Take of Sesame seeds.
  4. {Prepare of pumpkin cubes.
  5. {Take of butter.

Steps to make Miso Glazed Pumpkin:

  1. Pour hot water and add sugar and miso.Mix it until the sugar dissolved.Then heat a wok and dtop the butter must be in low fire.Then drop the sugar and miso mixture.Let the.butter melt..
  2. After the butter melted add in.pumpkin.Cook until the sauce thickens..
  3. When the sauce absorbs in a pumpkin.Arrange in a plate and sprinkle sesame seeds.

So that's going to wrap this up with this special food miso glazed pumpkin recipe. Thank you very much for your time. I am confident you can make this at home. There is gonna be interesting food in home recipes coming up. Remember to bookmark this page on your browser, and share it to your family, colleague and friends. Thank you for reading. Go on get cooking!

Step-by-Step Guide to Make Any-night-of-the-week Meat Tornado

Step-by-Step Guide to Make Any-night-of-the-week Meat Tornado

Meat Tornado.

Meat Tornado

Hey everyone, it is Louise, welcome to our recipe page. Today, I will show you a way to prepare a special dish, meat tornado. One of my favorites food recipes. This time, I am going to make it a bit unique. This will be really delicious.

Meat Tornado is one of the most favored of recent trending foods on earth. It's simple, it is fast, it tastes yummy. It is enjoyed by millions daily. They're fine and they look fantastic. Meat Tornado is something which I've loved my entire life.

To begin with this recipe, we have to prepare a few ingredients. You can have meat tornado using 17 ingredients and 7 steps. Here is how you can achieve it.

The ingredients needed to make Meat Tornado:

  1. {Take of 93% Ground Beef.
  2. {Get of whole eggs.
  3. {Prepare of fresh oregano chopped.
  4. {Take of parsley.
  5. {Make ready of salt/pepper.
  6. {Make ready of cayenne pepper.
  7. {Make ready of parmesan.
  8. {Take of saltine crackers.
  9. {Make ready of croutons.
  10. {Prepare of onion minced.
  11. {Take of garlic minced.
  12. {Prepare of olive oil.
  13. {Prepare of ketchup.
  14. {Get of apple cider vinegar.
  15. {Prepare of brown sugar.
  16. {Get of chicken broth.
  17. {Make ready of bacon.

Instructions to make Meat Tornado:

  1. IN KITCHEN AID MIX: ground beef eggs oregano parsley salt/pepper cayenne parmesan Broth.
  2. IN BLENDER POWDER: Handful Saltine crackers Handful croutons makes about a cup -set aside.
  3. IN SAUCE PAN COOK: onions garlic in olive oil.
  4. ADD TO SAUCE PAN: ketchup apple cider vinegar brown sugar until thickens slightly. Strain out onions/garlic (with slotted spoon or sieve) and throw those in with meat, set aside glaze..
  5. Add crumbs to meat and beat. Spray loaf pan. Shape into a loaf, glaze, cover with strips of bacon tucking them into the sides..
  6. Cook at 350°F for 70-80 min until internal temp is 165 and bacon is crispy.
  7. N.

So that is going to wrap this up for this special food meat tornado recipe. Thank you very much for your time. I'm confident that you will make this at home. There is gonna be more interesting food at home recipes coming up. Remember to save this page on your browser, and share it to your family, friends and colleague. Thanks again for reading. Go on get cooking!

Recipe of Quick Crockpot Chicken & gravy & mashed potatoes on Texas
bread

Recipe of Quick Crockpot Chicken & gravy & mashed potatoes on Texas bread

Crockpot Chicken & gravy & mashed potatoes on Texas bread.

Crockpot Chicken & gravy & mashed potatoes on Texas bread

Hello everybody, it is Drew, welcome to my recipe site. Today, I will show you a way to make a special dish, crockpot chicken & gravy & mashed potatoes on texas bread. One of my favorites food recipes. This time, I will make it a bit tasty. This is gonna smell and look delicious.

Crockpot Chicken & gravy & mashed potatoes on Texas bread is one of the most popular of recent trending meals in the world. It is appreciated by millions every day. It's easy, it is quick, it tastes yummy. Crockpot Chicken & gravy & mashed potatoes on Texas bread is something that I have loved my entire life. They are nice and they look fantastic.

To begin with this recipe, we have to first prepare a few components. You can have crockpot chicken & gravy & mashed potatoes on texas bread using 11 ingredients and 8 steps. Here is how you cook it.

The ingredients needed to make Crockpot Chicken & gravy & mashed potatoes on Texas bread:

  1. {Make ready 2 packs of low sodium chicken gravy envelopes or make your own chicken gravy homemade.
  2. {Prepare 1 of biggest can cream of chicken condensed soup for cooking. with or w/o herbs low sodium.
  3. {Take 3-4 of boneless skinless chicken breast.
  4. {Get 1 loaf of Texas Toast white loaf bread(bread isle, not frozen).
  5. {Prepare 1 of pot Homemade mashed potatoes(however you make yours).
  6. {Make ready 1 3/4 cup of water.
  7. {Prepare 1/8 tsp of black pepper.
  8. {Get As needed of seasonings of your choice( I used garlic, dash Italian herbs, McCormick vegetable, parsley, chives.
  9. {Get 1/2-1 of yellow onion.
  10. {Prepare 1 tbsp of or so of unsalted butter.
  11. {Make ready 1 tbsp of or so Ranch dry powder(optional).

Steps to make Crockpot Chicken & gravy & mashed potatoes on Texas bread:

  1. Spray pot with Pam. Pour the big can of cream of chicken in pot, the 2 gravy packets, water, butter, TBSP or so of ranch powder, black pepper, & any other seasonings..
  2. Whisk until very smooth..
  3. Add the chicken, and onions and press down into mixture where it's completely covered..
  4. Cook on high 4 hours or low 6-8 hours. Then shred the chicken with a 2 forks inside pot in small or bigger chunks..
  5. When it's close to 1/2 an hour or so from being done, make your homemade mashed potatoes. And any other side dish. Like corn or green beans..
  6. Once everything is done. Layer it on your plate. Piece of Texas loaf bread, mashed potatoes, then pour your chicken and gravy mixture on top, and sprinkle with parsley, chives,s&p. And serve with side of corn or green vegetable..
  7. What it looks like when you cut with a fork. It's so good!.
  8. Mixed bite on my fork..

So that is going to wrap it up with this exceptional food crockpot chicken & gravy & mashed potatoes on texas bread recipe. Thank you very much for your time. I am confident that you will make this at home. There is gonna be interesting food in home recipes coming up. Don't forget to save this page in your browser, and share it to your loved ones, friends and colleague. Thank you for reading. Go on get cooking!

Steps to Make Homemade Maple Walnut Strudel Coffee Cake

Steps to Make Homemade Maple Walnut Strudel Coffee Cake

Maple Walnut Strudel Coffee Cake.

Maple Walnut Strudel Coffee Cake

Hey everyone, it's me, Dave, welcome to my recipe page. Today, I'm gonna show you how to make a special dish, maple walnut strudel coffee cake. It is one of my favorites food recipes. For mine, I'm gonna make it a little bit tasty. This is gonna smell and look delicious.

Maple Walnut Strudel Coffee Cake is one of the most favored of current trending meals on earth. It's simple, it is fast, it tastes yummy. It's enjoyed by millions every day. They are fine and they look wonderful. Maple Walnut Strudel Coffee Cake is something that I've loved my whole life.

To get started with this recipe, we have to first prepare a few ingredients. You can cook maple walnut strudel coffee cake using 25 ingredients and 16 steps. Here is how you can achieve that.

The ingredients needed to make Maple Walnut Strudel Coffee Cake:

  1. {Take of For Cake:.
  2. {Get of Dry ingredients:.
  3. {Prepare of All Purpose Flour.
  4. {Prepare of Light Brown Sugar.
  5. {Take of Fine Salt.
  6. {Make ready of Baking Soda.
  7. {Prepare of Baking Powder.
  8. {Take of Wet Ingredients:.
  9. {Prepare of sour cream.
  10. {Take of Pure Maple Syrup.
  11. {Make ready of oil ( canola, vegetable or melted coconut oil.
  12. {Prepare of buttermilk or whole milk.
  13. {Make ready of large eggs beaten.
  14. {Take of maple extract (optional. Makes it more maple flavor).
  15. {Get of Chopped toasted walnuts.
  16. {Prepare of Strudel Mixture;.
  17. {Prepare of light brown sugar.
  18. {Prepare of all purpose flour.
  19. {Get of chopped toasted walnuts.
  20. {Make ready of cinnamon or nutmeg. I use both.
  21. {Prepare of unsalted butter, melted.
  22. {Take of Topping:.
  23. {Get of sifted powdered sugar.
  24. {Make ready of maple syrup.
  25. {Prepare of add 1 teaspoon maple extract for more intense maple flavor.

Instructions to make Maple Walnut Strudel Coffee Cake:

  1. Preheat oven to 350. While oven preheats, spray or butter a 9x9 inch square pan or cast iron or aluminum..
  2. Mix strudel ingredients until crumbly and set aside..
  3. In large bowl, mix dry ingredients for cake until well combined. Set aside..
  4. In separate bowl, mix wet ingredients until well combined..
  5. Make a well in the center of dry ingredients..
  6. Pour wet ingredients into well and gently fold into dry until just combined. Do not over mix..
  7. Pour half of the cake batter into prepared pan..
  8. Sprinkle half the strudel mixture over layer of cake in pan..
  9. Pour remaining batter over strudel layer..
  10. Sprinkle remaining strudel over top..
  11. Bake at 350 until toothpick inserted comes out clean. Check after 20 minutes..
  12. Cool for 15 minutes if removing from pan and finish cooling on wire rack..
  13. Mix topping ingredients to combine well. I sometimes add a few splashes of milk to thin for a glaze. You can make it thick if you prefer..
  14. Drizzle icing over warm cake..
  15. Serve warm if you prefer. Even better the next day..
  16. I love this for breakfast or snack with coffee or tea..

So that is going to wrap it up for this exceptional food maple walnut strudel coffee cake recipe. Thank you very much for reading. I'm confident that you can make this at home. There's gonna be interesting food at home recipes coming up. Remember to bookmark this page in your browser, and share it to your loved ones, colleague and friends. Thank you for reading. Go on get cooking!

Recipe of Homemade The Best Slow Cooker Corned Beef

Recipe of Homemade The Best Slow Cooker Corned Beef

The Best Slow Cooker Corned Beef.

The Best Slow Cooker Corned Beef

Hey everyone, I hope you are having an incredible day today. Today, I'm gonna show you how to make a distinctive dish, the best slow cooker corned beef. One of my favorites food recipes. This time, I am going to make it a little bit unique. This will be really delicious.

The Best Slow Cooker Corned Beef is one of the most popular of recent trending foods on earth. It is enjoyed by millions every day. It is simple, it's quick, it tastes delicious. They are nice and they look wonderful. The Best Slow Cooker Corned Beef is something that I have loved my whole life.

To begin with this particular recipe, we must first prepare a few ingredients. You can have the best slow cooker corned beef using 3 ingredients and 5 steps. Here is how you can achieve that.

The ingredients needed to make The Best Slow Cooker Corned Beef:

  1. {Prepare 1 of 2.5 - 4 lbs Package of corned beef.
  2. {Take 1 cup of to 1/2 cup of orange juice no pulp (I prefer) or pineapple juice.
  3. {Take 1 of I prefer filtered water.

Instructions to make The Best Slow Cooker Corned Beef:

  1. Remove the corned beef from the package and place the fatty side down in the crock pot..
  2. Add your juice to the crock pot..
  3. Add water until corn beef is completely covered, add the seasonings that comes with the package and then place the lid on the crock pot..
  4. Turn on crock pot it takes 6 to 8 hours 2.5 lbs at high and low 12 plus hours. Cook to the recommended internal temperature..
  5. Once cooked, remove from crock pot and let it sit for about 30 to 40 minutes. Remove the excess fat from underneath & then slice..

So that is going to wrap it up with this special food the best slow cooker corned beef recipe. Thanks so much for reading. I am sure that you can make this at home. There's gonna be interesting food in home recipes coming up. Don't forget to save this page on your browser, and share it to your family, friends and colleague. Thank you for reading. Go on get cooking!

How to Prepare Super Quick Homemade CURRY BUNS (Japanese Deep-fried
Curry Buns, Kare-Pan)

How to Prepare Super Quick Homemade CURRY BUNS (Japanese Deep-fried Curry Buns, Kare-Pan)

CURRY BUNS (Japanese Deep-fried Curry Buns, Kare-Pan).

CURRY BUNS (Japanese Deep-fried Curry Buns, Kare-Pan)

Hello everybody, I hope you are having an incredible day today. Today, I'm gonna show you how to make a distinctive dish, curry buns (japanese deep-fried curry buns, kare-pan). One of my favorites. For mine, I am going to make it a little bit unique. This will be really delicious.

CURRY BUNS (Japanese Deep-fried Curry Buns, Kare-Pan) is one of the most well liked of recent trending foods on earth. It is easy, it is quick, it tastes delicious. It's enjoyed by millions daily. CURRY BUNS (Japanese Deep-fried Curry Buns, Kare-Pan) is something which I've loved my entire life. They're nice and they look fantastic.

To get started with this particular recipe, we must first prepare a few ingredients. You can cook curry buns (japanese deep-fried curry buns, kare-pan) using 30 ingredients and 17 steps. Here is how you cook it.

The ingredients needed to make CURRY BUNS (Japanese Deep-fried Curry Buns, Kare-Pan):

  1. {Take of Buns.
  2. {Prepare 150 g of (1 and 1/5 us cups) bread flour.
  3. {Prepare 75 g of (3/5 us cup) cake flour.
  4. {Make ready 18 g (2 Tbsp) of cane sugar.
  5. {Make ready 4 g (2/3 tsp) of salt.
  6. {Prepare 2 g (2/3 tsp) of instant dry yeast.
  7. {Take 105 g of (3.5 us fl oz) lukewarm water.
  8. {Make ready 37 g (1.3 oz) of beaten egg.
  9. {Prepare 15 g (1.3 Tbsp) of unsalted butter.
  10. {Get of Curry Filling (Double the required amount).
  11. {Make ready 300 g of ground meat (mixed beef and pork).
  12. {Take 150 g (5.3 oz) of minced onion.
  13. {Make ready 1 piece of red chili pepper.
  14. {Take 1/2 tsp of cumin seed.
  15. {Take 1 Tbsp of cake flour.
  16. {Take of oil for frying onion.
  17. {Take of (For Curry Sauce).
  18. {Prepare 1/2 tsp of salt.
  19. {Prepare 2 Tbsp of curry powder.
  20. {Take 1 tsp of garam masala powder.
  21. {Get 30 g (2 Tbsp) of ketchup.
  22. {Prepare 2 Tbsp of Worcestershire sauce.
  23. {Prepare 1/2 clove of garlic (1 tsp grated garlic).
  24. {Get 1 of thumb-size piece of ginger (1 Tbsp grated ginger).
  25. {Get 1 cube of chicken stock bouillon (Maggi bouillon).
  26. {Make ready 300 ml of (10 us fl oz) water.
  27. {Take of For deep- frying.
  28. {Prepare of water.
  29. {Prepare of panko bread crumbs.
  30. {Make ready of oil for deep-frying.

Instructions to make CURRY BUNS (Japanese Deep-fried Curry Buns, Kare-Pan):

  1. ★Recipe video★ (my You Tube channel)→youtu.be/wMcc59UZaMQ.
  2. 【Curry Filling】Combine all curry sauce ingredients; salt, curry powder, garam masala, ketchup, Worcestershire sauce, grated garlic, grated ginger, a crushed bouillon cube, and water. Divide a red chili pepper in two and get rid of the seed; set aside..
  3. Heat oil in a frying pan over medium heat. Put cumin seed and chili pepper and fry it for about 30 sec. Put minced onion and fry it over medium heat until soft. Take it out from the pan; set aside..
  4. Put ground meat in the frying pan and fry it over medium-high heat until light brown. Turn down the heat, and remove extra oil with 2-3 sheets of paper towel..
  5. Put the fried onion and the curry sauce mixture in the pan. Cook it over medium heat for 5 mins while stirring..
  6. Turn off the heat, and put cake flour and stir well. If lumps of flour are formed, please crush them..
  7. Cook it over medium heat while stirring for another 5 mins or until it has thickened. Turn off the heat, let it cool. When it's cooled thoroughly, transfer to a bowl and cover with plastic wrap, and let it sit in a fridge overnight. The curry is double the required amount so use half to cook curry buns..
  8. 【Dough of Buns】Put bread flour, cake flour, instant dry yeast, and cane sugar in a large bowl. Mix well. Add about 2/3 of the lukewarm water and beaten egg. Mix roughly while cutting it..
  9. Pour the remaining water little by little against powdery places. Mix until it becomes a single mass. Spread the dough onto a work surface. Sprinkle salt over it, and put butter on..
  10. Knead it with your hands for 4-5 mins until combined. Hit the dough against the work surface for 5 mins. Repeat hitting and folding until smooth and elastic, for another 5 mins..
  11. Place it in a lightly oiled bowl. Cover with a plastic wrap. Let it rise at 40℃ / 104°F (or warm place) for about 40-60 mins until it has increased in size 1.5-2X. Please take the curry out of the fridge; set aside..
  12. Finger Dent Test! Press your floured finger into the dough. If the dent springs back a little, and it stays without filling in, it’s ready. Punch the air out. Divide it into 6 equal pieces..
  13. Punch down each piece and shape each into a ball. Please sprinkle bread flour when necessary. Cover with a damp towel and let it rest for 10 mins..
  14. 【Wrap the curry with the dough, and deep-fry!】Roll out into a 9 cm (3.5-inch) circle, sprinkling bread flour when necessary. Put 2-3 Tbsp of the curry paste in the center. Fold it and pinch the edges to seal well. Please pinch and press tightly so as not to open during deep frying..
  15. Cover with a damp towel. Let it rise at 40℃ / 104°F (or warm place) for about 20-30 mins until it has increased in size 1.2X..
  16. Dip the formed dough into the water and then place it in panko bread crumbs to coat..
  17. Heat the deep-frying oil to 320ºF (160ºC) in a frying pan. Deep-fry each dough for 5 mins or until golden brown on both sides. Drain excess oil. It's all done!.

So that's going to wrap this up with this special food curry buns (japanese deep-fried curry buns, kare-pan) recipe. Thank you very much for reading. I am sure you will make this at home. There's gonna be more interesting food in home recipes coming up. Remember to save this page in your browser, and share it to your loved ones, friends and colleague. Thank you for reading. Go on get cooking!

Steps to Prepare Homemade Open face sandwich breakfast

Steps to Prepare Homemade Open face sandwich breakfast

Open face sandwich breakfast.

Open face sandwich breakfast

Hey everyone, it's Brad, welcome to my recipe page. Today, I will show you a way to make a special dish, open face sandwich breakfast. It is one of my favorites. For mine, I'm gonna make it a bit tasty. This is gonna smell and look delicious.

Open face sandwich breakfast is one of the most well liked of recent trending foods in the world. It is appreciated by millions every day. It's simple, it's quick, it tastes yummy. They are nice and they look fantastic. Open face sandwich breakfast is something that I have loved my entire life.

To begin with this recipe, we have to first prepare a few components. You can cook open face sandwich breakfast using 8 ingredients and 3 steps. Here is how you cook that.

The ingredients needed to make Open face sandwich breakfast:

  1. {Take 1 slice of low GI brown bread.
  2. {Make ready 125 ml of baby spinach.
  3. {Prepare of Cheese.
  4. {Get 1 of egg.
  5. {Get 1/2 of Avocado.
  6. {Get 1 tablespoon of spoon Jimmysauce.
  7. {Prepare 1 teaspoon of oil.
  8. {Take 1/2 of Tomato.

Steps to make Open face sandwich breakfast:

  1. Add the oil to a pan and heat over medium heat. When the oil is hot, crack the egg into the pan and fry..
  2. While the egg is frying, toast your bread. Place the spinach, avocado, cheese, tomato on the toast and top with the egg..
  3. Drizzle the sauce over and garnish with fresh parsley and enjoy with tea, coffee or juice..

So that's going to wrap it up for this special food open face sandwich breakfast recipe. Thank you very much for reading. I'm sure that you can make this at home. There is gonna be interesting food at home recipes coming up. Remember to bookmark this page on your browser, and share it to your loved ones, friends and colleague. Thanks again for reading. Go on get cooking!

Step-by-Step Guide to Prepare Homemade Braunschweiger on Buttered
Pumpernickel Rye

Step-by-Step Guide to Prepare Homemade Braunschweiger on Buttered Pumpernickel Rye

Braunschweiger on Buttered Pumpernickel Rye.

Braunschweiger on Buttered Pumpernickel Rye

Hey everyone, it's me, Dave, welcome to my recipe site. Today, I will show you a way to make a distinctive dish, braunschweiger on buttered pumpernickel rye. One of my favorites. This time, I am going to make it a bit tasty. This will be really delicious.

Braunschweiger on Buttered Pumpernickel Rye is one of the most favored of current trending meals on earth. It is simple, it is fast, it tastes yummy. It's appreciated by millions daily. They are nice and they look fantastic. Braunschweiger on Buttered Pumpernickel Rye is something that I've loved my whole life.

To get started with this recipe, we must prepare a few components. You can have braunschweiger on buttered pumpernickel rye using 4 ingredients and 2 steps. Here is how you can achieve it.

The ingredients needed to make Braunschweiger on Buttered Pumpernickel Rye:

  1. {Take 1/3 pound of Braunschweiger.
  2. {Prepare 2 slices of pumpernickel rye bread.
  3. {Make ready 2 tablespoons of butter.
  4. {Make ready 1-1/2 tablespoons of dijon mustard.

Instructions to make Braunschweiger on Buttered Pumpernickel Rye:

  1. Butter the pumpernickel with softened or melted butter. Slice the Braunschweiger and add to the bread..
  2. Add the mustard and assemble the sandwich. Serve I hope you enjoy!!!!.

So that is going to wrap this up with this exceptional food braunschweiger on buttered pumpernickel rye recipe. Thanks so much for your time. I'm sure you can make this at home. There is gonna be more interesting food in home recipes coming up. Remember to save this page on your browser, and share it to your family, colleague and friends. Thank you for reading. Go on get cooking!

Easiest Way to Make Quick Simple lemongrass&vanilla
cookies #charityrecipe#4weekschallenge

Easiest Way to Make Quick Simple lemongrass&vanilla cookies #charityrecipe#4weekschallenge

Simple lemongrass&vanilla cookies #charityrecipe#4weekschallenge. Here are my favourite simple Lemongrass Substitutes. Lemongrass is a herb traditionally used in Thai cooking. It can be eaten raw or cooked and adds a unique aromatic lemony fragrance to dishes.

Simple lemongrass&vanilla cookies #charityrecipe#4weekschallenge Leave lemongrass, ginger and chilies in the soup and either try to pour the soup without them, or, better, pour the soup. Isn't it just a Thai cooking flavor? A spice they put in soup?

Hello everybody, it's Brad, welcome to our recipe site. Today, I will show you a way to prepare a special dish, simple lemongrass&vanilla cookies #charityrecipe#4weekschallenge. One of my favorites food recipes. This time, I am going to make it a bit unique. This is gonna smell and look delicious.

Simple lemongrass&vanilla cookies #charityrecipe#4weekschallenge is one of the most favored of current trending meals in the world. It is enjoyed by millions daily. It is simple, it's fast, it tastes yummy. They're fine and they look wonderful. Simple lemongrass&vanilla cookies #charityrecipe#4weekschallenge is something that I have loved my whole life.

Here are my favourite simple Lemongrass Substitutes. Lemongrass is a herb traditionally used in Thai cooking. It can be eaten raw or cooked and adds a unique aromatic lemony fragrance to dishes.

To get started with this particular recipe, we have to first prepare a few components. You can have simple lemongrass&vanilla cookies #charityrecipe#4weekschallenge using 7 ingredients and 7 steps. Here is how you can achieve it.

The ingredients needed to make Simple lemongrass&vanilla cookies #charityrecipe#4weekschallenge:

  1. {Make ready of flour self raising.
  2. {Prepare of sugar.
  3. {Take of butter/margarine.
  4. {Get of vanilla extract.
  5. {Make ready of milk (contains 50ml water infused with lemongrass).
  6. {Get of egg white.
  7. {Get of Piping nozzle optional.

The Origins of Lemongrass and How It Is Made Into an Essential Oil Originally from India… Lemongrass is an aromatic herb that has many uses in food and drinks. From herbal teas and cocktails to famous Thai dishes, see how it lends flavor. Lemongrass tea boasts a unique lemony flavor without the tart bite. With an unmistakable citrus-floral flavor, this woody ingredient—often found in Thai curries and Vietnamese dishes—may confuse the heck out of many.

Steps to make Simple lemongrass&vanilla cookies #charityrecipe#4weekschallenge:

  1. In a bowl whisk your sugar and butter thoroughly until white and fluffy.
  2. Then add your egg white and continue whisking moderately.
  3. After this begin to add in your flour slowly as you continue to mix..
  4. Lastly add your milk and vanilla extract and mix completely.
  5. Pipe the batter onto a greased baking sheet in your preferred shapes.
  6. Place in a preheated over 200°C and bake for 20 to 25 minutes.
  7. Leave to cool and serve with your favorite beverage 😊.

Lemongrass is a staple of Thai cuisine and is commonly included in many popular Thai dishes. Lemongrass has strong antibacterial and anti-fungal benefits. So, the tea can actually help you fight off infections and So you can never over-harvest the leaves to make this simple lemongrass tea recipe. simple lemongrass soup nutrition. Lemongrass infused tea with ginger and mint leaves. This happens to be one of the most common recipes of lemongrass.

So that is going to wrap it up for this exceptional food simple lemongrass&vanilla cookies #charityrecipe#4weekschallenge recipe. Thank you very much for your time. I'm sure that you will make this at home. There is gonna be more interesting food in home recipes coming up. Don't forget to save this page on your browser, and share it to your family, friends and colleague. Thanks again for reading. Go on get cooking!

Easiest Way to Prepare Perfect Corned Beef Fritters

Easiest Way to Prepare Perfect Corned Beef Fritters

Corned Beef Fritters.

Corned Beef Fritters

Hey everyone, it's John, welcome to our recipe site. Today, I will show you a way to make a distinctive dish, corned beef fritters. It is one of my favorites food recipes. This time, I am going to make it a little bit tasty. This is gonna smell and look delicious.

Corned Beef Fritters is one of the most popular of recent trending foods on earth. It is appreciated by millions every day. It's simple, it is quick, it tastes yummy. They are fine and they look fantastic. Corned Beef Fritters is something that I've loved my whole life.

To get started with this particular recipe, we have to prepare a few components. You can cook corned beef fritters using 5 ingredients and 3 steps. Here is how you cook it.

The ingredients needed to make Corned Beef Fritters:

  1. {Take of corned beef.
  2. {Make ready of egg.
  3. {Take of katakuriko or potato starch (regular flour should work, too).
  4. {Take of mild homemade rub -- https://cookpad.com/us/recipes/2667371-mild-homemade-rub.
  5. {Make ready of Oil for frying.

Steps to make Corned Beef Fritters:

  1. Combine corned beef, egg, katakuriko, and mild homemade rub. Mix well..
  2. Heat the oil in a frying pan. Medium heat should be fine..
  3. Use a spoon to pour the batter to the pan. Fry for a couple of minutes or so..

So that is going to wrap this up for this exceptional food corned beef fritters recipe. Thank you very much for reading. I am sure that you will make this at home. There is gonna be more interesting food in home recipes coming up. Remember to save this page in your browser, and share it to your family, colleague and friends. Thank you for reading. Go on get cooking!

Step-by-Step Guide to Make Award-winning Coconut milk candy

Step-by-Step Guide to Make Award-winning Coconut milk candy

Coconut milk candy.

Coconut milk candy

Hey everyone, I hope you're having an amazing day today. Today, we're going to make a special dish, coconut milk candy. It is one of my favorites food recipes. This time, I'm gonna make it a bit tasty. This is gonna smell and look delicious.

Coconut milk candy is one of the most well liked of current trending foods in the world. It's simple, it is fast, it tastes delicious. It is appreciated by millions daily. They're nice and they look fantastic. Coconut milk candy is something which I've loved my whole life.

To begin with this particular recipe, we have to prepare a few ingredients. You can have coconut milk candy using 4 ingredients and 5 steps. Here is how you can achieve that.

The ingredients needed to make Coconut milk candy:

  1. {Take 2 of medium coconut.
  2. {Take 4 cups of powdered milk.
  3. {Prepare 1/4 cup of sugar.
  4. {Prepare 1 cup of water.

Instructions to make Coconut milk candy:

  1. Scrape the back of the coconut with razor blade or peel it with a sharp knife and wash it properly.
  2. Grate the coconut using the smaller part of the grater.
  3. Add water and sugar to a put and bring to a boil until sugar completely dissolves,boil for at least 7 minutes.
  4. Add the grated coconut and keep on stirring until the water there is very little water left.
  5. Turn off the heat and add the milk,stir very well,allow to cool a bit and make small balls,your coconut candy is done..

So that is going to wrap this up for this exceptional food coconut milk candy recipe. Thank you very much for reading. I'm sure you can make this at home. There is gonna be interesting food in home recipes coming up. Don't forget to bookmark this page in your browser, and share it to your loved ones, colleague and friends. Thank you for reading. Go on get cooking!

Easiest Way to Prepare Speedy Coconut Milk Candy

Easiest Way to Prepare Speedy Coconut Milk Candy

Coconut Milk Candy.

Coconut Milk Candy

Hey everyone, it is Drew, welcome to my recipe page. Today, I will show you a way to make a distinctive dish, coconut milk candy. It is one of my favorites food recipes. This time, I'm gonna make it a bit tasty. This will be really delicious.

Coconut Milk Candy is one of the most well liked of recent trending foods on earth. It is appreciated by millions every day. It's simple, it's fast, it tastes yummy. Coconut Milk Candy is something which I have loved my whole life. They are nice and they look fantastic.

To get started with this recipe, we must prepare a few components. You can have coconut milk candy using 5 ingredients and 6 steps. Here is how you can achieve it.

The ingredients needed to make Coconut Milk Candy:

  1. {Get of Powdered milk.
  2. {Prepare of Sugar.
  3. {Make ready of Coconut flakes.
  4. {Prepare of Oil.
  5. {Take of Water.

Steps to make Coconut Milk Candy:

  1. Add water in a clean pot..
  2. When it boils add sugar and keep stirring till thick consistency..
  3. Add milk and coconut flakes and keep stirring until it's thick..
  4. Add a little oil..
  5. Pour the mixture on a tray..
  6. Cut into desire shape when it cools..

So that is going to wrap this up for this exceptional food coconut milk candy recipe. Thanks so much for reading. I'm confident you can make this at home. There is gonna be more interesting food at home recipes coming up. Remember to bookmark this page on your browser, and share it to your loved ones, colleague and friends. Thanks again for reading. Go on get cooking!

Steps to Prepare Any-night-of-the-week Cuban Bread Meat lovers Sandwich

Steps to Prepare Any-night-of-the-week Cuban Bread Meat lovers Sandwich

Cuban Bread Meat lovers Sandwich.

Cuban Bread Meat lovers Sandwich

Hello everybody, hope you are having an incredible day today. Today, I'm gonna show you how to make a distinctive dish, cuban bread meat lovers sandwich. It is one of my favorites food recipes. For mine, I'm gonna make it a little bit unique. This is gonna smell and look delicious.

Cuban Bread Meat lovers Sandwich is one of the most well liked of recent trending meals on earth. It's simple, it's quick, it tastes yummy. It's enjoyed by millions daily. They are fine and they look wonderful. Cuban Bread Meat lovers Sandwich is something which I've loved my whole life.

To get started with this particular recipe, we must first prepare a few components. You can cook cuban bread meat lovers sandwich using 23 ingredients and 17 steps. Here is how you can achieve it.

The ingredients needed to make Cuban Bread Meat lovers Sandwich:

  1. {Prepare of ---- meat--------.
  2. {Make ready of eye of round steak sliced very thin.
  3. {Make ready of boneless and skinless chicken thighs.
  4. {Take of Bacon.
  5. {Get of pork loin.
  6. {Get of ----bread and spread -------.
  7. {Make ready of Cuban bread.
  8. {Take of minced black ripe olives.
  9. {Make ready of mayonnaise.
  10. {Make ready of yellow prepared mustard.
  11. {Prepare of butter.
  12. {Prepare of -----condiments --------.
  13. {Take of shredded lettuce, iceberg.
  14. {Make ready of large tomatoes.
  15. {Get of finely shredded cheddar cheese.
  16. {Make ready of hamburger dill pickle chips.
  17. {Take of salt to taste banana pepper rings, optional.
  18. {Prepare of --meat marinade and spices-----.
  19. {Prepare of ground white pepper.
  20. {Prepare of white wine.
  21. {Get of granulated garlic powder.
  22. {Make ready of extra Virgin olive oil.
  23. {Make ready of dehydrated onions.

Steps to make Cuban Bread Meat lovers Sandwich:

  1. Get a skillet hot then turn heat on low.
  2. Fry the bacon rendering the fat.
  3. When the bacon is crispy remove to a paper towel. Keep the bacon drippings.
  4. Cut the meat up into small pieces.
  5. Add spices, wine, and extra Virgin olive oil..
  6. Put into a bag and marinate 30 minutes.
  7. Add to a hot deep pan, that the bacon was fried in, then add onions. Cover and simmer till done..
  8. Slice the bread.
  9. Mix the mayonnaise, mustard, and olives.
  10. Spread the olive mixture on the bread.
  11. Add pickles and bacon.
  12. Add meat mixture lettuce and cheese.
  13. Add tomatoes.
  14. Butter one side of bread.
  15. Lay the butter side of bread in hot skillet.
  16. When the bread is toasted add butter to untoasted side and turn.
  17. Wrap in parchment paper cut in half and serve.

So that is going to wrap this up with this exceptional food cuban bread meat lovers sandwich recipe. Thank you very much for reading. I'm confident you will make this at home. There's gonna be interesting food at home recipes coming up. Don't forget to save this page on your browser, and share it to your family, colleague and friends. Thank you for reading. Go on get cooking!

Recipe of Speedy "Savory" Corned Beef Hash

Recipe of Speedy "Savory" Corned Beef Hash

"Savory" Corned Beef Hash.

"Savory" Corned Beef Hash

Hey everyone, it's Brad, welcome to my recipe page. Today, I'm gonna show you how to make a distinctive dish, "savory" corned beef hash. It is one of my favorites food recipes. This time, I will make it a little bit unique. This will be really delicious.

"Savory" Corned Beef Hash is one of the most well liked of recent trending meals in the world. It is simple, it is quick, it tastes yummy. It is enjoyed by millions daily. "Savory" Corned Beef Hash is something which I've loved my entire life. They're nice and they look wonderful.

To get started with this particular recipe, we must prepare a few ingredients. You can cook "savory" corned beef hash using 13 ingredients and 10 steps. Here is how you cook it.

The ingredients needed to make "Savory" Corned Beef Hash:

  1. {Get of cooked corned beef, diced or shredded.
  2. {Make ready of cooked potatoes, diced or chopped.
  3. {Get of broth (corned beef or beef).
  4. {Get of medium yellow onion, diced.
  5. {Prepare of garlic, smashed.
  6. {Make ready of whole-grain mustard.
  7. {Get of nutmeg, powdered cloves, and ginger.
  8. {Take of dried thyme.
  9. {Make ready of salt and pepper.
  10. {Get of unsalted butter, divided.
  11. {Make ready of light cooking oil, divided.
  12. {Make ready of fresh parsley, finely chopped.
  13. {Take of eggs poached.

Steps to make "Savory" Corned Beef Hash:

  1. In a large bowl, add the corned beef and potatoes and mix lightly. Add the broth, the onions, garlic, and mustard. Mix lightly..
  2. Add the seasonings and spices, and mix well. Cover and refrigerate ideally overnight..
  3. Heat half the butter and half the oil in a pan or skillet over medium-high heat..
  4. [Heat water - eggs for poaching in a separate pan or pot].
  5. When the foaming of the butter subsides, add the hash mixture. Press down and form into a pancake the size of the pan. Fry for 3 minutes now on medium heat..
  6. Tighten up the sides of the cake and cook for another 4 minutes. Look for the underside to be brown and crispy..
  7. Flip the hash using a large spatula (or use a plate on top, invert, and slide off into pan). Add the rest of the butter and oil as you flip the mixture..
  8. Rise the heat to medium-high and cook for 3 minutes. Firm up the edges. Reduce the heat to medium, cook for 4 minutes more..
  9. Finish poaching eggs or fry eggs in a separate pan..
  10. Plate the corned beef hash and top with a poached egg (or pan-fried egg) and chopped parsley..

So that is going to wrap this up for this special food "savory" corned beef hash recipe. Thank you very much for your time. I'm confident that you will make this at home. There's gonna be more interesting food in home recipes coming up. Don't forget to save this page on your browser, and share it to your loved ones, friends and colleague. Thank you for reading. Go on get cooking!

Easiest Way to Make Homemade Coconut laddu

Easiest Way to Make Homemade Coconut laddu

Coconut laddu.

Coconut laddu

Hey everyone, it's me again, Dan, welcome to our recipe site. Today, I will show you a way to make a special dish, coconut laddu. It is one of my favorites food recipes. For mine, I'm gonna make it a bit tasty. This will be really delicious.

Coconut laddu is one of the most favored of recent trending meals in the world. It's enjoyed by millions daily. It is simple, it is fast, it tastes delicious. Coconut laddu is something that I've loved my whole life. They are nice and they look wonderful.

To begin with this recipe, we must first prepare a few ingredients. You can cook coconut laddu using 6 ingredients and 3 steps. Here is how you can achieve it.

The ingredients needed to make Coconut laddu:

  1. {Prepare 2 cup of desicated coconut.
  2. {Get 1/2 cup of condensed milk.
  3. {Make ready 5-6 tsp of Dry fruit powder.
  4. {Make ready 1 tbsp of butter/ghee.
  5. {Make ready 1 tsp of cinnamon powder.
  6. {Make ready 4 tbsp of milk.

Instructions to make Coconut laddu:

  1. Take a pan low flame add butter/ghee add coconut mix it 2 to 4 minute in low flame and add condensed milk and add dry fruit powder and add cinnamon powder 2 to 3 minute mix and mixture is dough form and add milk and than ready coconut ladoo mixture..
  2. Take a 2 bowl add green color 2 bowl add orange color coconut laddu Tripathi and mix it well color and 1 tsp mixture laddu dsiceta coconut cot and than ready dsiceta coconut laddu..
  3. Very easy to make.

So that's going to wrap it up with this special food coconut laddu recipe. Thank you very much for reading. I am sure you can make this at home. There's gonna be more interesting food at home recipes coming up. Remember to bookmark this page in your browser, and share it to your loved ones, friends and colleague. Thanks again for reading. Go on get cooking!

Recipe of Any-night-of-the-week Fried Pies

Recipe of Any-night-of-the-week Fried Pies

Fried Pies.

Fried Pies

Hey everyone, it's me, Dave, welcome to our recipe page. Today, I will show you a way to prepare a special dish, fried pies. It is one of my favorites food recipes. For mine, I'm gonna make it a little bit tasty. This is gonna smell and look delicious.

Fried Pies is one of the most popular of recent trending meals in the world. It's enjoyed by millions every day. It is easy, it is fast, it tastes delicious. They are fine and they look wonderful. Fried Pies is something that I've loved my entire life.

To begin with this recipe, we have to first prepare a few ingredients. You can have fried pies using 13 ingredients and 14 steps. Here is how you cook that.

The ingredients needed to make Fried Pies:

  1. {Get of Filling--------.
  2. {Get 3 of large apples.
  3. {Take 1/4 cup of brown sugar.
  4. {Make ready 1 teaspoon of vanilla extract.
  5. {Make ready 2 tablespoons of all purpose flour.
  6. {Make ready 3 tablespoon of water.
  7. {Make ready 1 teaspoon of ground cinnamon.
  8. {Get of Crust----------.
  9. {Prepare As needed of crust see my recipe fried pie crust.
  10. {Take of Glaze-----------.
  11. {Take 1 cup of powdered sugar.
  12. {Get 2 tablespoons of milk.
  13. {Take 1 teaspoon of vanilla extract.

Instructions to make Fried Pies:

  1. Peel and core the apples and slice them thinly..
  2. To make the filling, combine the apples, brown sugar, cinnamon, and vanilla in a small sauce pan. Cook until juices start to form, about 3 minutes..
  3. Make a slurry by whisking together the water and flour. Stir this into the pan, turn the heat up to high, and cook, stirring constantly, until mixture is thickened, about 3 minutes longer. Set aside..
  4. Separate dough into 6 equal balls..
  5. Roll the balls out into rectangular sheets.
  6. Heat the oil for frying..
  7. Add the pie filling to the sheets..
  8. Cover them over and crimp the sides.
  9. One at a time fry them for 2-3 minutes per side..
  10. Move to paper towels to absorb excessive oils..
  11. Mix the milk, vanilla extract, and powdered sugar..
  12. Add Glaze to the warm Pies. Let hardened.
  13. Glaze the other side of pie..
  14. Serve I hope you enjoy! You can refrigerate or freeze the dough. I also accidentally used self-rising flour instead of all purpose flour..

So that's going to wrap this up for this exceptional food fried pies recipe. Thanks so much for reading. I'm sure you can make this at home. There's gonna be interesting food in home recipes coming up. Don't forget to save this page in your browser, and share it to your loved ones, friends and colleague. Thanks again for reading. Go on get cooking!

Recipe of
Homemade #CreamyFruitySandwich #LightDessertOrAfternoonTeaSandwich #themechallenge

Recipe of Homemade #CreamyFruitySandwich #LightDessertOrAfternoonTeaSandwich #themechallenge

#CreamyFruitySandwich #LightDessertOrAfternoonTeaSandwich #themechallenge.

#CreamyFruitySandwich #LightDessertOrAfternoonTeaSandwich  #themechallenge

Hey everyone, it's Drew, welcome to my recipe site. Today, I'm gonna show you how to prepare a distinctive dish, #creamyfruitysandwich #lightdessertorafternoonteasandwich #themechallenge. One of my favorites. For mine, I will make it a little bit unique. This will be really delicious.

#CreamyFruitySandwich #LightDessertOrAfternoonTeaSandwich #themechallenge is one of the most favored of recent trending foods in the world. It's simple, it's fast, it tastes delicious. It is appreciated by millions every day. They're fine and they look fantastic. #CreamyFruitySandwich #LightDessertOrAfternoonTeaSandwich #themechallenge is something that I have loved my whole life.

To get started with this recipe, we must first prepare a few ingredients. You can have #creamyfruitysandwich #lightdessertorafternoonteasandwich #themechallenge using 6 ingredients and 4 steps. Here is how you cook it.

The ingredients needed to make #CreamyFruitySandwich #LightDessertOrAfternoonTeaSandwich #themechallenge:

  1. {Prepare of pces white sandwich bread.
  2. {Make ready of mashed avocado mix with condensed milk.
  3. {Make ready of whipped cream.
  4. {Get of Chocolate spread.
  5. {Make ready of Fruits (strawberries for flower effect, green apple for leaves effect, mango, banana).
  6. {Prepare of Cling film for wrapping.

Steps to make #CreamyFruitySandwich #LightDessertOrAfternoonTeaSandwich #themechallenge:

  1. On a chopping board keep piece of cling film, keep bread slice on it and spread some whipped cream on it,,, now arrange strawberry in the middle secure it with cream,,, now arrange green apple slices as leaves,, again secure it with cream,, all this arrange in the middle of the bread slice,.
  2. If you want use avocado paste or chocolate spread, arrange according to that.
  3. Now put another slice of bread on fruits and wrap in cling film and keep it in deep fridge.
  4. After 2 hours remove from fridge and cut sides of the sandwich and make cut in the middle with sharp knife and your creamy fruity sandwich is ready.

So that is going to wrap it up with this exceptional food #creamyfruitysandwich #lightdessertorafternoonteasandwich #themechallenge recipe. Thanks so much for reading. I'm confident that you will make this at home. There's gonna be interesting food in home recipes coming up. Remember to save this page on your browser, and share it to your family, colleague and friends. Thanks again for reading. Go on get cooking!

How to Prepare Favorite Avocado Cucumber Sandwich

How to Prepare Favorite Avocado Cucumber Sandwich

Avocado Cucumber Sandwich.

Avocado Cucumber Sandwich

Hey everyone, it is me again, Dan, welcome to our recipe page. Today, I will show you a way to prepare a distinctive dish, avocado cucumber sandwich. One of my favorites food recipes. This time, I'm gonna make it a little bit unique. This is gonna smell and look delicious.

Avocado Cucumber Sandwich is one of the most popular of recent trending foods on earth. It's simple, it's quick, it tastes yummy. It's enjoyed by millions daily. Avocado Cucumber Sandwich is something which I've loved my entire life. They're nice and they look wonderful.

To get started with this particular recipe, we have to prepare a few ingredients. You can have avocado cucumber sandwich using 8 ingredients and 4 steps. Here is how you can achieve it.

The ingredients needed to make Avocado Cucumber Sandwich:

  1. {Get of Ciabatta buns.
  2. {Get of Avocados.
  3. {Take of cucumber, skin peeled.
  4. {Take of Red onion, diced.
  5. {Get of Goat's milk cheese.
  6. {Make ready of Basil pesto.
  7. {Take of lime for juice.
  8. {Get of Salt & pepper.

Instructions to make Avocado Cucumber Sandwich:

  1. Cut ciabatta buns in half, spread lightly with basil pesto. Lay on a cookie sheet, pesto side up, and broil in the oven until toasted and edges are golden..
  2. Cut avocado and scoop out flesh. Mash with fork in a small bowl until consistent. Add diced red onion (chopped small) and squeeze in lime juice. Add salt & pepper to taste. Mix well..
  3. Cut cucumber in half, and peel skin. Cut into spears..
  4. Spread avocado mixture onto bun, sprinkle with crumbled goat's milk cheese. Top with cucumber spears. Enjoy!.

So that's going to wrap it up for this exceptional food avocado cucumber sandwich recipe. Thank you very much for your time. I am confident you will make this at home. There's gonna be interesting food in home recipes coming up. Remember to save this page on your browser, and share it to your loved ones, friends and colleague. Thank you for reading. Go on get cooking!

Easiest Way to Make Award-winning Oreo Churros

Easiest Way to Make Award-winning Oreo Churros

Oreo Churros.

Oreo Churros

Hello everybody, hope you're having an amazing day today. Today, I'm gonna show you how to prepare a special dish, oreo churros. One of my favorites food recipes. For mine, I'm gonna make it a little bit tasty. This is gonna smell and look delicious.

Oreo Churros is one of the most favored of current trending meals in the world. It is simple, it's quick, it tastes yummy. It's enjoyed by millions daily. Oreo Churros is something that I've loved my whole life. They are nice and they look wonderful.

To get started with this recipe, we must first prepare a few components. You can cook oreo churros using 8 ingredients and 18 steps. Here is how you can achieve it.

The ingredients needed to make Oreo Churros:

  1. {Take 36 of Oreo's.
  2. {Make ready 2 cups of water.
  3. {Get 4 tbsp of butter.
  4. {Get 1 cup of sugar, divided (1/3 cup for batter, 2/3 cup to roll churros in).
  5. {Make ready 1 cup of flour.
  6. {Prepare 2 of eggs.
  7. {Make ready of oil for frying.
  8. {Make ready 1 cup of heavy cream.

Instructions to make Oreo Churros:

  1. Separate the cookies oreo and the filling into two bowls..
  2. Process the cookies to a fine crumb in food processor..
  3. In a pot, add water butter, 1/3 cup sugar and bring to a boil.
  4. Add the flour and oreo crumbs..
  5. Whisk together until fluffy combined..
  6. Add two eggs and whisk together again..
  7. In a pipping bag with a large star tip, pipe 5 inch section onto a parchment paper lined cookies sheet..
  8. Freeze completely mininum 2 hours to preserve the shape and help the frying look perfect..
  9. When you are ready to fry them, heat 2 inches of oil in the large pot to 350 degrees..
  10. Add churros in batch to the hot oil and cook for 2 minutes each side..
  11. In a shallow bowl add 2/3 cup sugar..
  12. Drain the oil from he churros and roll in sugar..
  13. Add the heavy cream to your stand mixer with the whisk attachment..
  14. Melt the oreo fillings for 10 seconds to soften..
  15. Whisk until peaks form and add in the oreo filling..
  16. Whisk on high untill filling incorporated completely..
  17. Refrigerate whipped cream until you are ready to served..
  18. Enjoy.

So that is going to wrap it up for this exceptional food oreo churros recipe. Thank you very much for reading. I am confident you can make this at home. There's gonna be more interesting food at home recipes coming up. Don't forget to save this page on your browser, and share it to your family, friends and colleague. Thanks again for reading. Go on get cooking!

Step-by-Step Guide to Make Any-night-of-the-week Sinigang na Liempo
(Filipino dish)

Step-by-Step Guide to Make Any-night-of-the-week Sinigang na Liempo (Filipino dish)

Sinigang na Liempo (Filipino dish).

Sinigang na Liempo (Filipino dish)

Hey everyone, it's me, Dave, welcome to our recipe page. Today, I will show you a way to make a special dish, sinigang na liempo (filipino dish). One of my favorites food recipes. For mine, I am going to make it a little bit unique. This will be really delicious.

Sinigang na Liempo (Filipino dish) is one of the most favored of current trending meals in the world. It is easy, it's fast, it tastes yummy. It's enjoyed by millions daily. They are fine and they look wonderful. Sinigang na Liempo (Filipino dish) is something that I've loved my whole life.

To begin with this particular recipe, we must prepare a few ingredients. You can have sinigang na liempo (filipino dish) using 10 ingredients and 5 steps. Here is how you can achieve it.

The ingredients needed to make Sinigang na Liempo (Filipino dish):

  1. {Get of pork (liempo).
  2. {Get of tomatoes sliced.
  3. {Prepare of onion sliced.
  4. {Make ready of romaine lettuce.
  5. {Get of gabi.
  6. {Take of green chili.
  7. {Prepare of flavor mix tamarind powder.
  8. {Get of Salt and pepper.
  9. {Get of fish sauce.
  10. {Get of water.

Steps to make Sinigang na Liempo (Filipino dish):

  1. Boil pig liempo with water in a pot until it turned soft.
  2. Set aside pig liempo first then use the boiled water of pig liempo. Put sliced tomatoes and onion. Let it stand until it boils for 3-5 mins. Add the pig liempo again. And make it boil..
  3. Season with tamarind powder mix and let it boil for 7 mins..
  4. Add fish sauce, salt and pepper..
  5. Add gabi. Let it stand for 5 mins until it boils. Put romaine lettuce in final. Ready to serve!.

So that is going to wrap it up for this special food sinigang na liempo (filipino dish) recipe. Thanks so much for your time. I'm confident you will make this at home. There's gonna be interesting food in home recipes coming up. Remember to bookmark this page in your browser, and share it to your loved ones, friends and colleague. Thanks again for reading. Go on get cooking!

Step-by-Step Guide to Prepare Speedy Tomato Avocado Salad in honey lime
dressing

Step-by-Step Guide to Prepare Speedy Tomato Avocado Salad in honey lime dressing

Tomato Avocado Salad in honey lime dressing.

Tomato Avocado Salad in honey lime dressing

Hello everybody, it's Drew, welcome to our recipe site. Today, we're going to make a distinctive dish, tomato avocado salad in honey lime dressing. It is one of my favorites food recipes. This time, I am going to make it a bit tasty. This is gonna smell and look delicious.

Tomato Avocado Salad in honey lime dressing is one of the most popular of current trending foods on earth. It's appreciated by millions daily. It's easy, it is quick, it tastes delicious. They are nice and they look wonderful. Tomato Avocado Salad in honey lime dressing is something which I've loved my whole life.

To get started with this particular recipe, we must prepare a few ingredients. You can have tomato avocado salad in honey lime dressing using 9 ingredients and 3 steps. Here is how you can achieve that.

The ingredients needed to make Tomato Avocado Salad in honey lime dressing:

  1. {Make ready 2 of large roma tomatoes - diced.
  2. {Prepare 1 of medium avocado - pitted, scooped out of skin and diced.
  3. {Take 1/2 of medium onion - thinly sliced.
  4. {Get 1 of large lime.
  5. {Get 2 tbs of minced fresh cilantro.
  6. {Get 2 tsp of honey.
  7. {Take 1/2-1 tsp of sriracha type hot sauce.
  8. {Take 2 tbs of olive oil.
  9. {Prepare Pinch of salt and pepper.

Instructions to make Tomato Avocado Salad in honey lime dressing:

  1. Place prepared tomatoes, avocado, and onion in a medium bowl with a tight fitting lid..
  2. Zest and juice lime into a separate medium bowl. Add cilantro, honey, sriracha, olive oil, and a pinch of salt and pepper to lime juice. Wisk to combine..
  3. Drizzle dressing over salad mixture. Gently toss to coat. Cover salad directly with plastic wrap, place lid on container, and refrigerate for 1 hr before serving. Enjoy!.

So that's going to wrap this up with this exceptional food tomato avocado salad in honey lime dressing recipe. Thank you very much for your time. I am confident you can make this at home. There's gonna be interesting food in home recipes coming up. Remember to bookmark this page on your browser, and share it to your family, colleague and friends. Thank you for reading. Go on get cooking!